Tutorial — Use the pipeline viewer
Tutorial: Use the pipeline viewer
By the end of this walkthrough you'll convert a PDF using the built-in pipeline viewer in a browser — no API integration, no code. You'll watch the pipeline progress live, inspect each phase's output, look at the change ledger, and download the final accessible markdown. Plan for ~10 minutes.
The viewer is the fastest path for accessibility reviewers, partners previewing Reflow before a pilot, and anyone who wants to see what the pipeline actually does to a document. For programmatic integration, see integrate via the API.
What you need
- A running Reflow instance. If you have access to the UIC deployment, use
https://reflow.equalify.uic.edu. If you're running it yourself,make devin theequalify-reflowrepo brings uphttp://localhost:8080/. - A PDF to convert. Anything under 100 MB and 50 pages. Short documents (under ten pages) finish in 2–4 minutes.
- A browser. Tested in current Chrome, Firefox, and Safari.
1. Open the viewer
Point your browser at the Reflow instance root — for example https://reflow.equalify.uic.edu/ or http://localhost:8080/ for local dev. You'll land on the upload page: a header with the Equalify Reflow logo, the five pipeline phases as tabs (greyed out until a document is loaded), and a dashed drop zone in the centre.
2. Upload a PDF
Three ways to start:
- Drag and drop a PDF file anywhere on the drop zone.
- Click the drop zone to open a file picker.
- Keyboard: tab to the drop zone, then press Enter or Space to open the file picker.
3. Watch the pipeline run
The top tab row shows the five public phases: Extraction → Analysis → Headings → Translation → Assembly. Each tab lights up as its stage begins and shows its elapsed time when the stage completes.
- An active spinner on a tab means the stage is running right now.
- A green checkmark means the stage completed successfully.
- An amber skip icon means the stage was skipped (for example, OCR when the PDF didn't need it).
- A red alert icon means the stage errored non-fatally; the pipeline continues with the best output it had.
Typical end-to-end time for a 6-page PDF on Claude Haiku 4.5: ~3 minutes, about $0.50 of AI cost. Longer documents scale roughly linearly.
4. Navigate the layout
Once the first stage completes, the viewer opens up into its working layout:
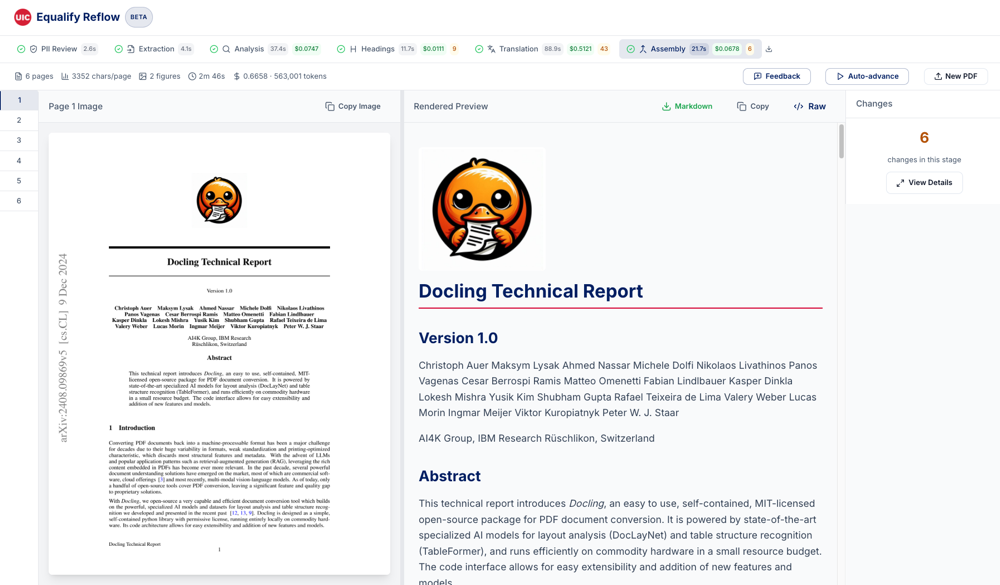
Header and stage tabs at the top, stats bar below, page thumbnails on the far left, page image and rendered markdown in the middle, changes panel on the right.
The page sidebar (left)
Lists every page in the document. Click a page number to jump to it. The active page is highlighted with a blue left border. Only appears for multi-page documents.
The page image + markdown split (centre)
- Left panel: the original PDF page as a rendered image. A Copy Image button in the top-right copies the PNG to your clipboard — useful for pasting into review tickets or accessibility audits.
- Right panel: the current stage's markdown for this page, rendered as HTML.
- Drag the vertical divider between the two panels to resize. Useful when a page is image-heavy or text-heavy.
The changes panel (right)
Shows how many edits the AI made in the currently selected stage. Click View Details to open a full modal with each edit's before, after, and the AI's reasoning.
When you're on the Analysis stage, this panel is replaced by a structure metadata view — see step 6.
The stats bar
Top-of-content strip showing the document's key facts:
- Pages — total page count
- Chars/page — average characters per page (low numbers on a page-heavy document can signal scanned content)
- "Likely scanned" — appears when the classifier flags image-only pages
- Figures — how many figures Docling extracted
- Time — total elapsed pipeline time
- Cost / tokens — running LLM cost and token count (only when AI stages have run)
5. Inspect the output of each phase
Click any stage tab to see what that phase produced. The markdown panel re-renders with the document as it looked after that stage, and the change count updates to show how many edits happened there.
This is the core value of the viewer: you can see exactly what each phase changed. The Extraction stage has no AI edits (it's Docling), but Translation might have dozens. Open the View Details modal on a stage to read every edit and its reasoning.
6. Analysis stage: the structure metadata panel
When you click the Analysis tab, the right-hand changes panel is replaced by a structure metadata panel. This shows the document dossier the AI built during analysis:
- Page Attributes — layout type (single-column, double-column, presentation, poster), flags for images / tables / lists / equations / scanned pages
- Outline — every heading found, with recommended level and page number
- Code Blocks — detected code blocks with language + first/last line
- Footnotes — every footnote with its marker and body
7. Download what you need
From any stage:
- Download markdown (right panel, top-right icon) — the current stage's full-document markdown
- Download stage version (stage tab download icon) — the version produced by that specific stage.
v0is Docling output; later versions are after AI edits - Copy markdown (right panel) — copy the current page's markdown to your clipboard
- Copy page image (left panel) — PNG of the current page
v3 markdown.
8. Keyboard shortcuts
The viewer is fully keyboard-navigable. Every major region has a direct-jump shortcut so you don't have to tab through a long list of elements:
| Shortcut | Does |
|---|---|
| ⌘ / Ctrl + 0 | Open the skip-navigation menu |
| ⌘ / Ctrl + 1 | Jump to the page sidebar |
| ⌘ / Ctrl + 2 | Jump to the stage tabs |
| ⌘ / Ctrl + 3 | Jump to the rendered preview |
| ⌘ / Ctrl + 4 | Jump to the changes panel |
| ⌘ / Ctrl + / | Open this shortcut help inside the viewer |
9. Warnings banner
If the PDF classifier detects something the pipeline handles less well — a scanned document, very long text blocks, unusual structure — a warnings banner appears above the stats bar describing what it found. The pipeline still runs; the banner is a heads-up for reviewers, not a failure.
10. Start over with a new document
New PDF in the stats bar (or ⌘ / Ctrl + U via the skip menu) resets the viewer to the upload screen. Previous processing isn't discarded on the server — if you need to come back to it, the pipeline viewer sessions remain queryable via the API for a retention period. For the viewer UI itself, think of each upload as a one-shot session.
Tips
- Scanned documents. The viewer triggers OCR as a conditional step within Extraction. Expect the Extraction phase to take 1–2 minutes longer on scanned PDFs. Check the stats bar for the "Likely scanned" indicator.
- Reviewing accessibility. Always check the Analysis stage's outline against your mental model of the document. If the outline looks wrong, the downstream Headings and Assembly stages are working from a bad map — flag it via provide feedback.
- Cost awareness. The stats bar's cost counter updates live. If the cost is climbing faster than you expected (over roughly $0.10 per page is a heads-up), the document probably triggered extra subagent calls — an image-heavy or table-heavy layout.
- Skip navigation keyboard. ⌘/Ctrl+0 is the accessibility entry point. Screen reader users should start there.
What the viewer doesn't do
The pipeline viewer is a one-shot interactive tool — it's not a document management system. Specifically:
- No persistent library of past conversions (use the API for that)
- No collaboration or review assignments (feedback goes through the feedback mechanism)
- No batch processing (upload one PDF at a time; for bulk jobs, use the API)
Where to go next
- Interpret the output — the reviewer's 4-minute quality scan for a converted document
- Integrate via the API — copy-pasteable recipes for programmatic conversion
- Provide feedback — submit corrections and issue reports from the built-in viewer
- How it works — what the pipeline is actually doing during those five phases